
Looking to upgrade your hallway with a touch of style and functionality? This Shaker-style hallway paneling DIY tutorial is perfect for anyone wanting to add character, organization, and a bit of farmhouse flair to their space - all without breaking the bank! In this step-by-step guide, I'll show you how to create beautiful board and batten wall paneling with a built-in shelf and hooks to maximize storage and organize your hallway.
Table of contents
Why We Needed Hallway Panelling
After our trusty standing coat rack bit the dust, we had nowhere for guests to hang their coats in our hallway. While our family's coats live in the closet by the door, we still needed a solution for visitors. Inspired by some leftover wood in our basement, we decided to try our hand at DIY hallway paneling. Spoiler alert: This project turned out so good that we’re already planning another, more intricate, paneling/wainscotting adventure! Stay tuned for that tutorial, but for now, let’s dive into this easy hallway project.
Materials You’ll Need:
A note about the listed products: If you order a product from one of the partners via links on this page, I receive a small percentage. I only recommend products that I have already used myself or have selected with care. You pay the same price whether you use my affiliate link or not. For more details, Please read my full disclosure here.
Materials for the Hallway Paneling
- Drop cloth
- Tape measure
- Pencil
- MDF
- High-strength grab adhesive for MDF
- Painter’s tape
- Spirit level
- Fine sandpaper
- Lint-free cloth
- Paint roller and tray
- MDF sealer
- Narrow paintbrush
- Paintable caulk
- Caulk gun
- Paint color of choice
For the Shelf
- Wooden shelf
- Shelf supports (I used brass triangle brackets)
- Screws
- Screwdriver
- Drill
- Spirit level
- Under-shelf coat hooks
Shop the post

How to Measure for DIY Wall Paneling
Measuring is crucial for getting the perfect fit. Getting the measurements right is the hardest part of this project, but once you have them down, the rest of the wall paneling project is quick and easy to assemble. Trust me, if you take the time to get the measurements right, you will be rewarded with perfect hallway paneling.
Top Tip
When paneling a crooked wall, instead of paneling right to the edge of the wall, leave a small border on the wall on each side of the paneling so that the unevenness of the wall is not so obvious. Unless you are very DIY-savvy and can cut the panel to the exact size of the wall yourself.
Follow these simple steps:
- Decide the Height of Your Paneling: Determine how high you want the paneling to go. I stopped mine short of the wall’s full height to leave room for a shelf above.
- Measure the Wall Width: Use a tape measure to record the width of the wall you want to panel. If your walls are crooked (like mine), measure in a few places and use the smallest measurement for accuracy. You can find my measurements in the step-by-step instructions below.
- Plan Panel Placement: Use painter’s tape to visualize the panel layout. This helps you decide how many panels you need and where the vertical strips will go.
- Account for the Skirting Board: If your skirting board is thicker than your MDF panels, ensure your measurements keep the panels flush with the wall.
- Mark and Double-Check: Once you’ve planned, mark your measurements clearly and double-check everything before cutting or purchasing materials.

Step-by-Step Instructions for Hallway Paneling
1. Cut Your MDF Panels
Back Panels
I had my MDF cut at the DIY store to make transport easier. For my wall (118 cm wide by 170 cm high), I split the MDF backing panel into three equal sections of 6 mm thick MDF and had narrow strips cut for the vertical panels.
NOTE: The joins between the three MDF pieces will be invisible when the paneling is finished because we will cover them with the narrow panel pieces. I had the backing panels cut to 39 cm wide and 170 cm long.
Horizontal top panel
I chose 10mm thick MDF for the horizontal top panel because I wanted it to stand out from the rest of the hallway paneling. I had this top panel cut to 10 cm wide.
Narrow inner panels
The narrow inner panels of 6 mm MDF were cut to 7 cm wide.
Tip
Most home improvement stores will cut MDF to size for you if you ask.
2. Attach the MDF Backing Panels

Apply “No More Nails” or a similar adhesive to the back of the panels. Avoid applying adhesive all the way to the edges of the panel to prevent it from squeezing out when you press the panel onto the wall.
Press each panel firmly onto the wall.
If your wall is a little bowed and the MDF panel won’t stick in certain spots (which means the glue might not hold it up properly), don’t stress! Just pop a screw in the top and bottom of the panel—pick spots that’ll be covered by one of the narrow top panels later. This way, the screw will stay hidden, and you won’t even know it’s there once everything’s finished!
Don’t worry about any gaps along the sides. Once everything is in place, you’ll be caulking the edges, so any little spaces will get filled in, and you'll have a clean, smooth finish. Easy peasy!

3. Prime and Seal
While the adhesive dries, prime the MDF inner panels and top piece with an MDF sealer. Use a roller for even coverage and let it dry fully (Mine said to wait 6 hours before adding a second coat). Sand lightly between coats for a smooth finish. (If you're thinking about skipping this step, see the FAQ section below to find out why you shouldn't).

4. Attach Vertical Strips

First, use adhesive to attach the narrow, vertical MDF strips, starting with the edges and working inward. Align them carefully using a spirit level.
Next, attach the horizontal top panel at the top of the paneling.

5. Fill Gaps with Caulk
Once the adhesive is dry, use paintable caulk to fill gaps between panels, the wall, and all edges. Cut the caulk tube tip at a slight angle to control the flow. Some caulking guns have a built-in spout cutter, but you can use a sharp knife to cut the spout open if yours doesn't. Run your finger over the caulk for a neat finish.

6. Paint Your Paneling
Paint your panels in your chosen color (I used white eggshell because it's hard-wearing). Apply two coats, sanding lightly and wiping between coats for a professional look.

Adding the Shelf and Hooks
I wish I had some photos of this step to share with you, but my husband, in his excitement to see the project finished, went ahead and installed the shelf while I was at work! No worries, though—I’ve included instructions below on how to fit the shelf. If you’re looking for extra guidance, I have a step-by-step tutorial for putting up shelves right here.
1. Prepare the Shelf
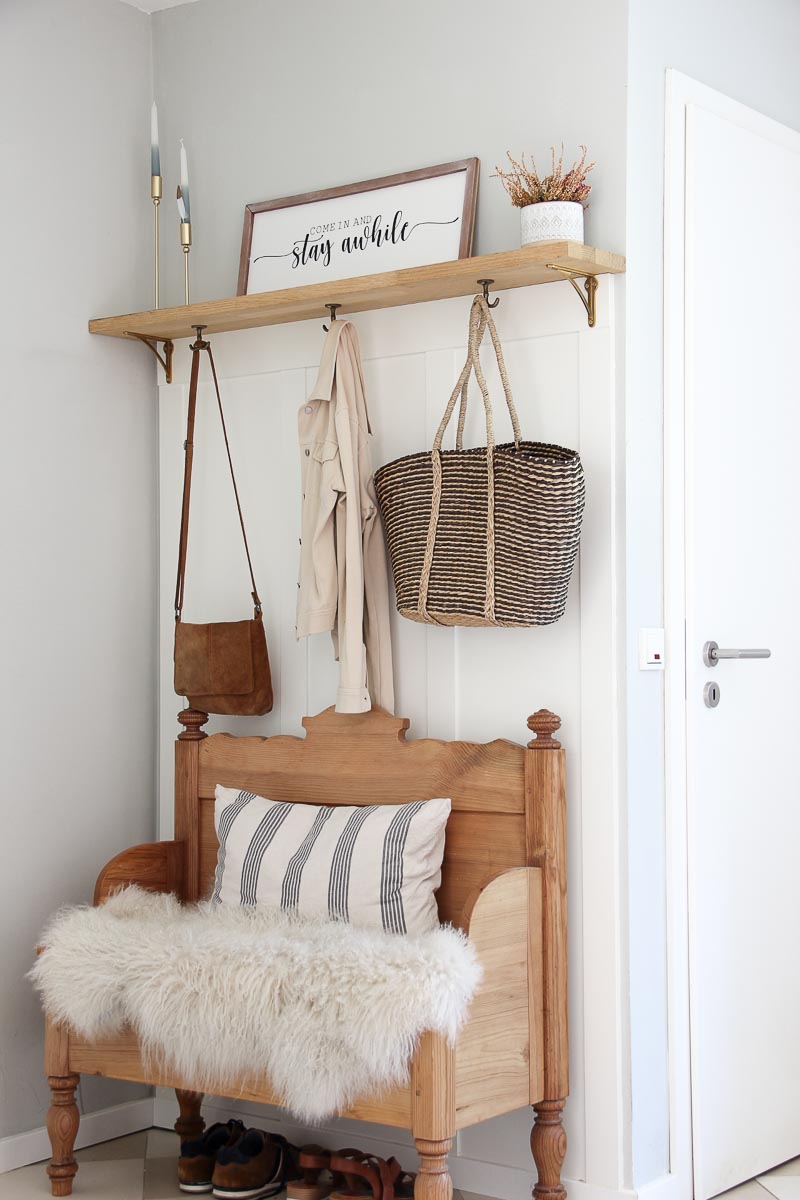
Choose a wooden shelf that complements your space. Being a 'woods and whites' fan, I left mine in its natural wood tone for contrast against the white wall paneling.
2. Attach Brackets
Measure 5 cm inward from each end of the shelf and mark the spots for the brackets. Use a drill to create pilot holes for the screws then use a screwdriver to attach the brackets to the underside of the shelf with screws.
3. Secure the Shelf
Align the shelf above the paneling and attach the brackets to the top horizontal panel using screws. Use a spirit level to ensure it’s straight.
4. Add Hooks
Screw some hooks to the underside of the shelf, spaced evenly. I used three double hooks to hang coats and bags.
Tip
You can find a detailed tutorial for putting up shelves here.
Styling Your DIY Hallway Paneling

Once your paneling and shelf are complete, you can add some personality! Here are some ideas:
- Decorate the Shelf: Add a handmade hallway sign, small plants, or framed pictures.
- Add baskets: Instead of decoration, add baskets for storing small items like hats, scarves, and gloves.
- Use the Hooks: Keep coats, bags, and hats tidy.
- Add a Rug: A hallway rug can tie the hallway together and add warmth.
I considered adding a bench, but since this hallway paneling is right behind the front door and there’s already a bench directly across from it, I decided to skip it. That said, I couldn’t resist moving the bench in front of the paneling just to see how it would look—and I have to admit, it wasn’t a bad idea! What do you think?
Tip
You can find the tutorial for making a DIY farmhouse sign here.
Final Thoughts
This DIY hallway paneling with hooks and a shelf is an easy, affordable way to transform your space. It’s absolutely perfect for keeping your hallway tidy and adding a touch of farmhouse flair at the same time. Plus, whether you’re a DIY pro or just starting out, this is one of those projects that anyone can tackle. Best of all, it makes a big impact without requiring a ton of effort—what's not to love about that?


We Want to Hear from You: Have you tried wall paneling?
So, what do you think of the final look? Would you add a bench or some extra accessories? I’d love to hear your thoughts in the comments! If you give this wall paneling project a try, I’d be thrilled to hear about your experience—don’t forget to share your results!
Happy DIYing!

Don't forget to subscribe to my weekly newsletter through the form at the end of this post. By signing up, you'll receive more creative ideas and DIY projects directly in your inbox. You will gain access to our free ebooks and printable library upon signing up.
Follow me on social media here: Pinterest | Facebook | Instagram
Hallway Paneling DIY, FAQ
Yes! Leave a small border around the edges, or carefully measure and cut the MDF to fit the uneven wall. Caulk can help fill small gaps.
Not really! MDF is super absorbent, especially along the edges, so if you skip prepping it first, your paint job could end up looking uneven and patchy—not what you want after all that work. To get a smooth, professional finish, start with a good primer or MDF sealer. This step locks in the surface and stops the paint from soaking in. Once it’s dry, give it a light sanding for that silky-smooth base, and then you’re good to go with your favorite paint color. I’d recommend something like eggshell or satin for a hallway—it’s durable and easy to clean!
Use 6mm MDF for the vertical strips to keep them flush with the skirting board. For the top horizontal piece, 10mm MDF works well.
An eggshell or satin finish is ideal since it offers both durability and easy cleaning.
Yes, lightly sand between coats for a smooth, professional finish.





Leave a Reply